
| 일 | 월 | 화 | 수 | 목 | 금 | 토 |
|---|---|---|---|---|---|---|
| 1 | 2 | 3 | 4 | 5 | 6 | 7 |
| 8 | 9 | 10 | 11 | 12 | 13 | 14 |
| 15 | 16 | 17 | 18 | 19 | 20 | 21 |
| 22 | 23 | 24 | 25 | 26 | 27 | 28 |
| 29 | 30 |
- 스파르타내일배움캠프
- 롤
- sort
- 코딩테스트준비
- 자바
- 라이엇
- programmers
- API
- Django
- 탐욕알고리즘
- 스파르타내일배움캠프TIL
- Riot
- SQL
- 내일배움캠프
- python
- 그리디알고리즘
- greedy
- java
- github
- lol
- 프로그래머스
- 그리디
- 파이썬
- git
- 리그오브레전드
- 알고리즘
- 백준
- drf
- 코딩테스트
- 장고
- Today
- Total
Lina's Toolbox
dbdiagram.io: Django 프로젝트에서 ERD 자동으로 그려주는 사이트 본문
dbdiagram.io: Django 프로젝트에서 ERD 자동으로 그려주는 사이트
Woolina 2024. 8. 27. 17:46
Django 프로젝트에서 자동으로 ERD를 생성해주는 사이트를 찾던 중 알게된 사이트!
dbdiagram.io
dbdiagram.io - Database Relationship Diagrams Design Tool
dbdiagram.io
dbdiagram.io
- 웹 기반의 ERD 도구로, 간단한 SQL 같은 구문을 사용하여 데이터베이스 구조를 시각화할 수 있다.
DBdiagram.io 웹사이트의 제공된 텍스트 편집기에
SQL 또는 DSL(Data Structure Language)을 사용하여 테이블과 관계를 정의하면,
자동으로 ERD를 생성해주는 아주 똑똑한 녀석!!
웹사이트에 들어가서 작업만 하면 되므로, 설치도 따로 필요 없다.
하지만 장고의 Models.py 내용으로 ERD를 자동 생성하려면,
주어진 Django 모델을 DBML 형식으로 변환해야한다.
작성 예시
Django Models.py
#accounts/models.py

from django.db import models
from django.contrib.auth.models import AbstractUser
from django.core.files.storage import default_storage

class User(AbstractUser):
    # 팔로우 관계 설정
    followings = models.ManyToManyField(
        'self',
        related_name='user_followers',  # 역참조 이름을 'user_followers'로 설정
        symmetrical=False
    )

    followers = models.ManyToManyField(
        'self',
        related_name='user_followings',  # 역참조 이름을 'user_followings'로 설정
        symmetrical=False
    )

    # 프로필 이미지
    profile_image = models.ImageField(
        upload_to='images/profile_images/',  # 프로필 이미지가 저장될 디렉토리
        null=True,  # 이미지가 없어도 허용
        blank=True,  # 관리자 폼에서 필수 입력이 아님
        default='images/default/default_profile_image.png'  # 기본 이미지의 경로
    )

    # 프로필 이미지를 변경할 때 기존 프로필 사진 파일 삭제
    def save(self, *args, **kwargs):
        if self.pk:  # 사용자가 이미 존재하는지 확인
            old_user = User.objects.get(pk=self.pk)
            if old_user.profile_image and old_user.profile_image != self.profile_image:
                # 기본 이미지는 삭제하지 않도록 확인
                if old_user.profile_image.name != 'images/default/default_profile_image.png':
                    if default_storage.exists(old_user.profile_image.name):
                        default_storage.delete(old_user.profile_image.name)

        super(User, self).save(*args, **kwargs)
#products/models.py
from django.db import models
from django.conf import settings
from django.core.exceptions import ValidationError
# 해시태그 기능
class Tag(models.Model):
name = models.CharField(max_length=30, unique=True) # 해시태그는 유일해야 함
def __str__(self):
return self.name
def clean(self):
# 해시태그는 띄어쓰기와 특수문자를 포함할 수 없음
if ' ' in self.name or any(char in self.name for char in "#@!$%^&*()"):
raise ValidationError("해시태그는 띄어쓰기와 특수문자를 포함할 수 없습니다.")
class Product(models.Model):
title = models.CharField(max_length=50)
content = models.TextField()
price = models.IntegerField(default=0)
created_at = models.DateTimeField(auto_now_add=True)
updated_at = models.DateTimeField(auto_now=True)
image = models.ImageField(upload_to="images/", blank=True)
view_cnt = models.PositiveIntegerField(default=0) # 조회수
author = models.ForeignKey(
settings.AUTH_USER_MODEL, on_delete=models.CASCADE, related_name="products"
)
like_users = models.ManyToManyField(
settings.AUTH_USER_MODEL, related_name="like_products"
)
# 해시 태그
tags = models.ManyToManyField(Tag, related_name="products", blank=True)
def __str__(self):
return self.title
# 조회수 증가
def increment_view_cnt(self):
# Increase the view count by 1
self.view_cnt += 1
self.save()
def save(self, *args, **kwargs):
super().save(*args, **kwargs) # 기본 save 호출
if self.pk: # 객체가 데이터베이스에 저장된 후
# tags 필드를 설정하기 위해 추가적인 로직을 이곳에 구현할 수 있습니다.
pass
class Comment(models.Model):
product = models.ForeignKey(
Product, on_delete=models.CASCADE, related_name="comments"
)
user = models.ForeignKey(
settings.AUTH_USER_MODEL, on_delete=models.CASCADE, related_name="comments"
)
content = models.CharField(max_length=120)
created_at = models.DateTimeField(auto_now_add=True)
updated_at = models.DateTimeField(auto_now=True)
def __str__(self):
return self.content
두 모델 파일의 내용을 합쳐서,
SQL 스타일로 테이블과 관계를 정의하여 DBdiagram.io에서 사용할 수 있는 스키마를 작성해보자.
// Use DBML to define your database structure
// Docs: https://dbml.dbdiagram.io/docs

Table users {
    id integer [primary key, increment] // 기본 키, 자동 증가
    username varchar [unique, not null] // 사용자 이름
    email varchar [unique, not null] // 이메일 주소
    password varchar [not null] // 비밀번호
    profile_image varchar [note: 'Profile image path'] // 프로필 이미지 경로
    created_at timestamp [not null, default: `now()`] // 생성 일자
}

Table follows {
    id integer [primary key, increment] // 기본 키, 자동 증가
    follower_user_id integer [not null] // 팔로워 ID
    following_user_id integer [not null] // 팔로잉 ID
    created_at timestamp [not null, default: `now()`] // 생성 일자
}

Table tags {
    id integer [primary key, increment] // 기본 키, 자동 증가
    name varchar(30) [unique, not null] // 해시태그 이름
}

Table products {
    id integer [primary key, increment] // 기본 키, 자동 증가
    title varchar(50) [not null] // 제품 제목
    content text [not null] // 제품 내용
    price integer [not null, default: 0] // 제품 가격
    created_at timestamp [not null, default: `now()`] // 생성 일자
    updated_at timestamp [not null, default: `now()`] // 수정 일자
    image varchar [note: 'Image path'] // 이미지 경로
    view_cnt integer [default: 0] // 조회수
    author_id integer [not null] // 작성자 (외래 키)
}

Table comments {
    id integer [primary key, increment] // 기본 키, 자동 증가
    product_id integer [not null] // 제품 ID
    user_id integer [not null] // 사용자 ID
    content varchar(120) [not null] // 댓글 내용
    created_at timestamp [not null, default: `now()`] // 생성 일자
    updated_at timestamp [not null, default: `now()`] // 수정 일자
}

Table product_likes {
    id integer [primary key, increment] // 기본 키, 자동 증가
    product_id integer [not null] // 제품 ID
    user_id integer [not null] // 사용자 ID
}

Table product_tags {
    id integer [primary key, increment] // 기본 키, 자동 증가
    product_id integer [not null] // 제품 ID
    tag_id integer [not null] // 태그 ID
}

// 관계 정의
Ref: products.author_id > users.id // Many-to-One 관계 (Product와 User)
Ref: comments.product_id > products.id // Many-to-One 관계 (Comment와 Product)
Ref: comments.user_id > users.id // Many-to-One 관계 (Comment와 User)
Ref: product_likes.product_id > products.id // Many-to-One 관계 (ProductLike와 Product)
Ref: product_likes.user_id > users.id // Many-to-One 관계 (ProductLike와 User)
Ref: product_tags.product_id > products.id // Many-to-One 관계 (ProductTag와 Product)
Ref: product_tags.tag_id > tags.id // Many-to-One 관계 (ProductTag와 Tag)
Ref: follows.follower_user_id > users.id // Many-to-Many 관계 (User 간의 팔로워 관계)
Ref: follows.following_user_id > users.id // Many-to-Many 관계 (User 간의 팔로잉 관계)
References with same endpoints exist 에러
DBML에서 "References with same endpoints exist" 오류는 동일한 외래 키 관계가 여러 번 정의된 경우 발생한다.
이 문제를 해결하기 위해 중복된 외래 키 참조를 정리하고, DBML의 구문 규칙에 맞게 관계를 정의해야 한다.
예를 들어, 중복된 참조 제거한다.
더 자세한 작성 문법은,
https://dbml.dbdiagram.io/docs/ 를 참고하여 작성하자.
Syntax | DBML
DBML (database markup language) is a simple, readable DSL language designed to define database structures. This page
dbml.dbdiagram.io
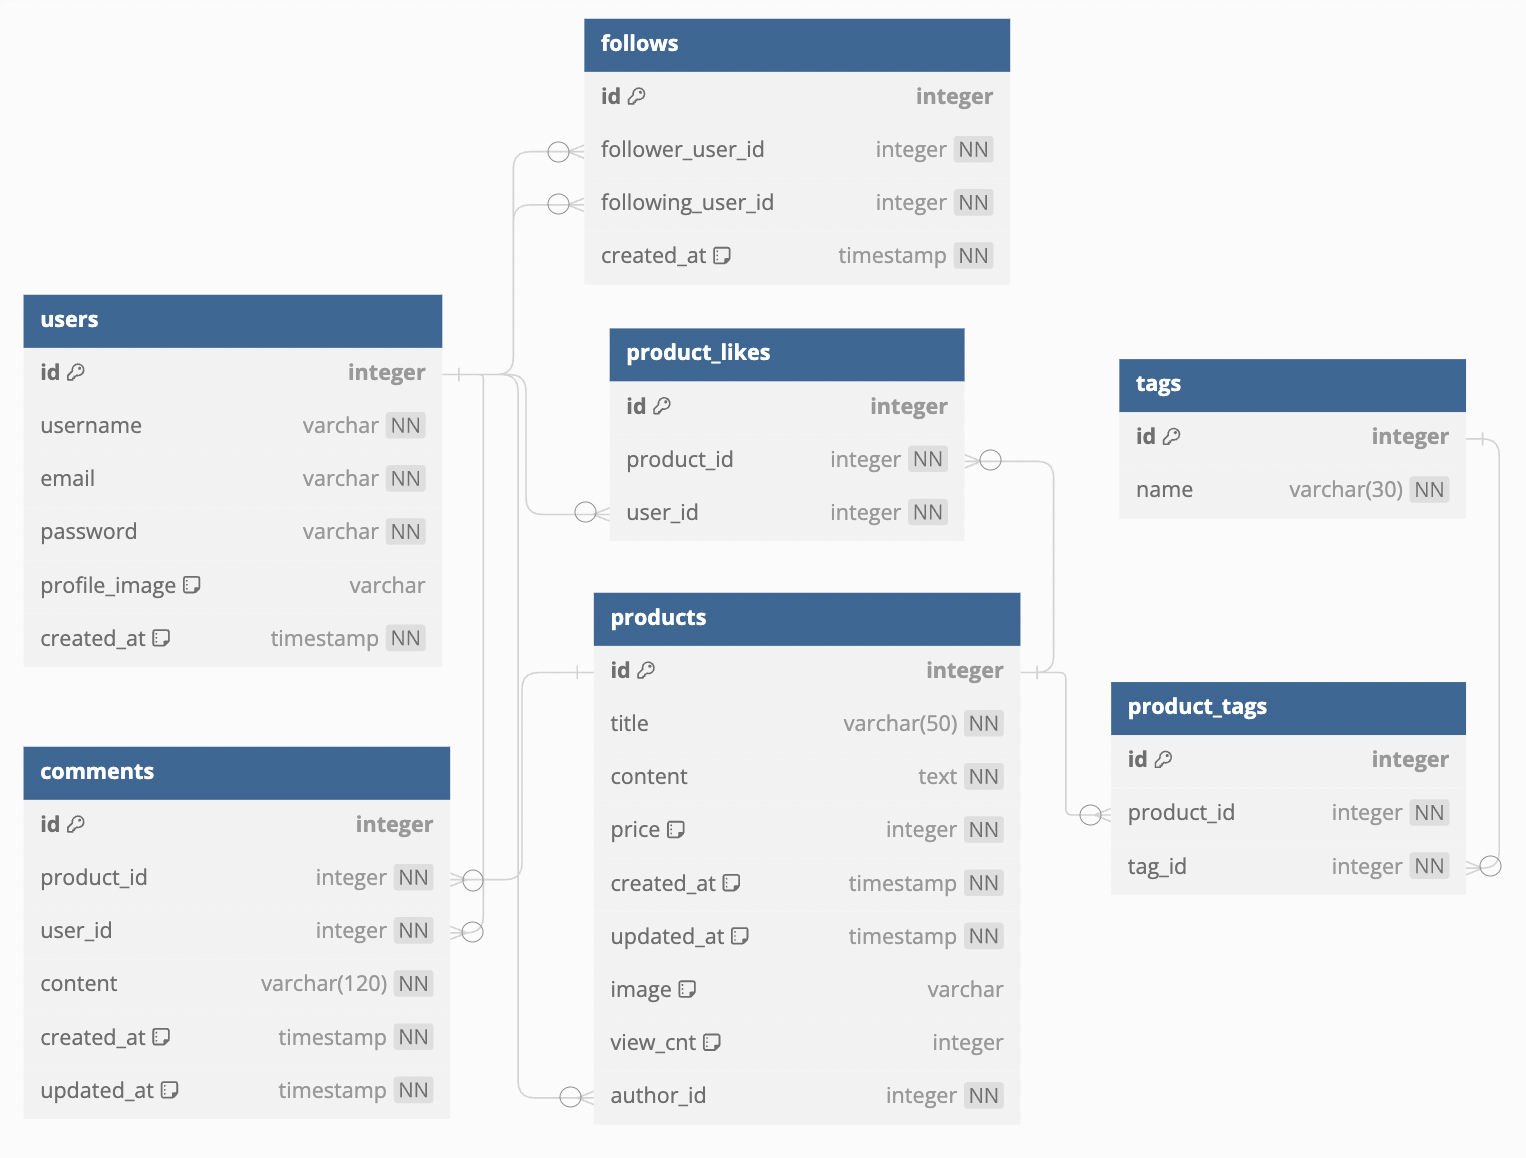
결과
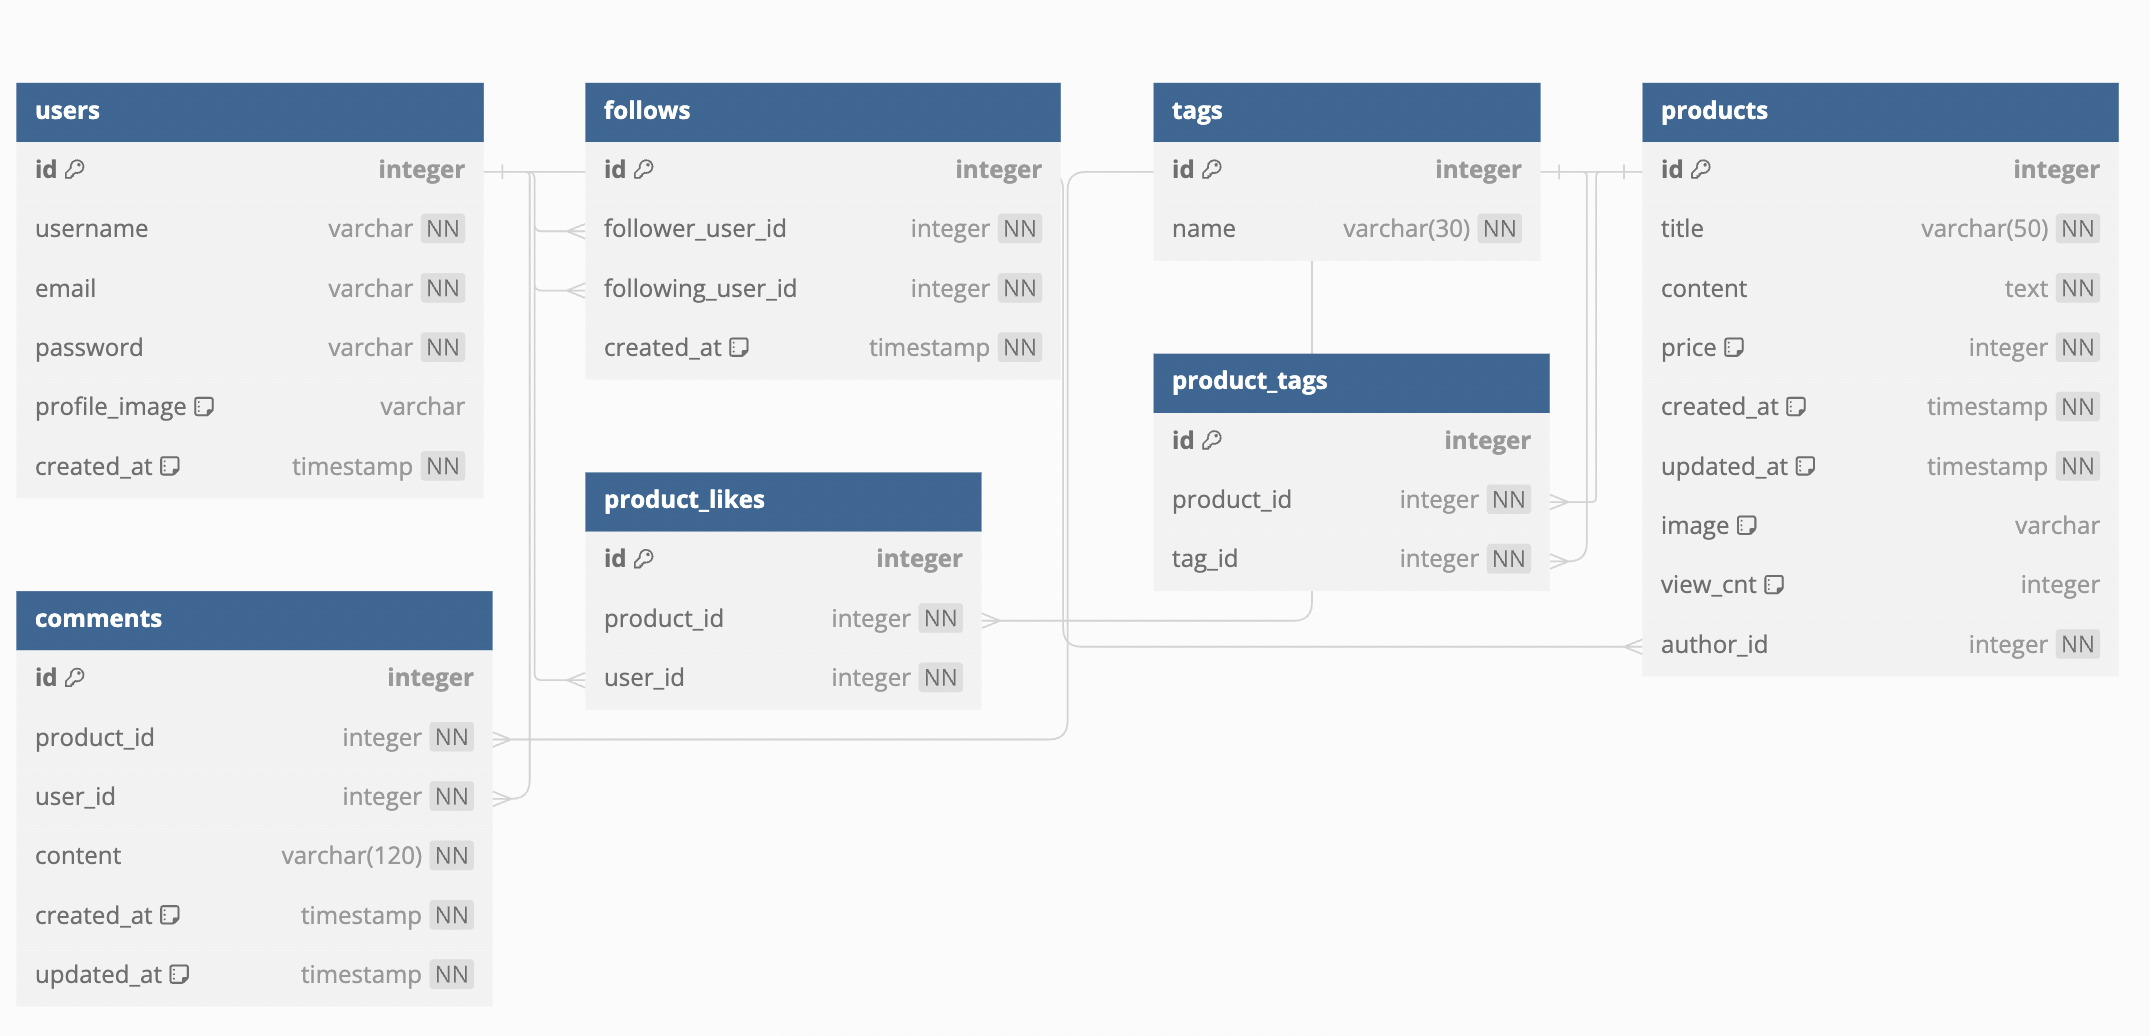
짜잔!!! 이렇게 아름다운 ERD가 무려 자동으로 완성되었다!
한계점
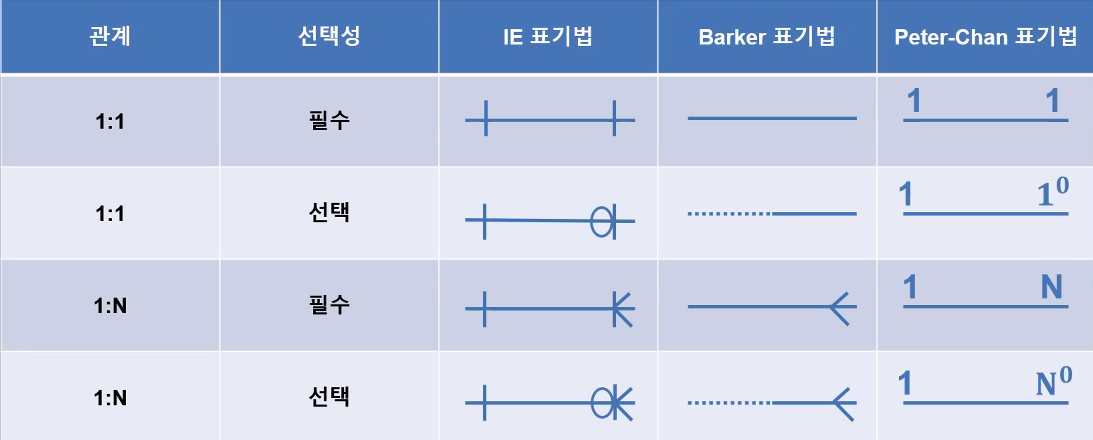
dbdiagram.io에서 DBML을 사용하여 관계를 정의할 때,
기본적으로 관계의 선택성(옵셔널 또는 필수)를 그래픽적으로 나타내는 것은 지원되지 않는다.
그래프에서 선에 동그라미(옵셔널) 또는 다른 모양(필수)을 표시하는 기능이 없기 때문에 관계의 선택성을 시각적으로 표현할 수 없다. dbdiagram.io는 주로 관계의 방향성과 기본적인 관계만을 시각화한다.
따라서 나는 선택 관계에만 따로 동그라미들을 추가해주었다!
'스파르타 내일 배움 캠프 AI 웹개발 과정 > Django framework' 카테고리의 다른 글
| Django MTV 사용하기 RUD (Read, Update, Delete) (0) | 2024.08.30 |
|---|---|
| Django MTV 사용하기 CR (Create, Read) (0) | 2024.08.29 |
| Django ORM (0) | 2024.08.27 |
| Django Model (0) | 2024.08.20 |
| Django 의 다중앱과 URL (0) | 2024.08.16 |


